How To Choose A Practical Boot Organisation Setup For Family Travel
A practical step-by-step guide to how to choose a practical boot organisation setup for family travel, including preparation, instructions, common issues, tips, and next steps.
How To Choose A Practical Boot Organisation Setup For Family Travel
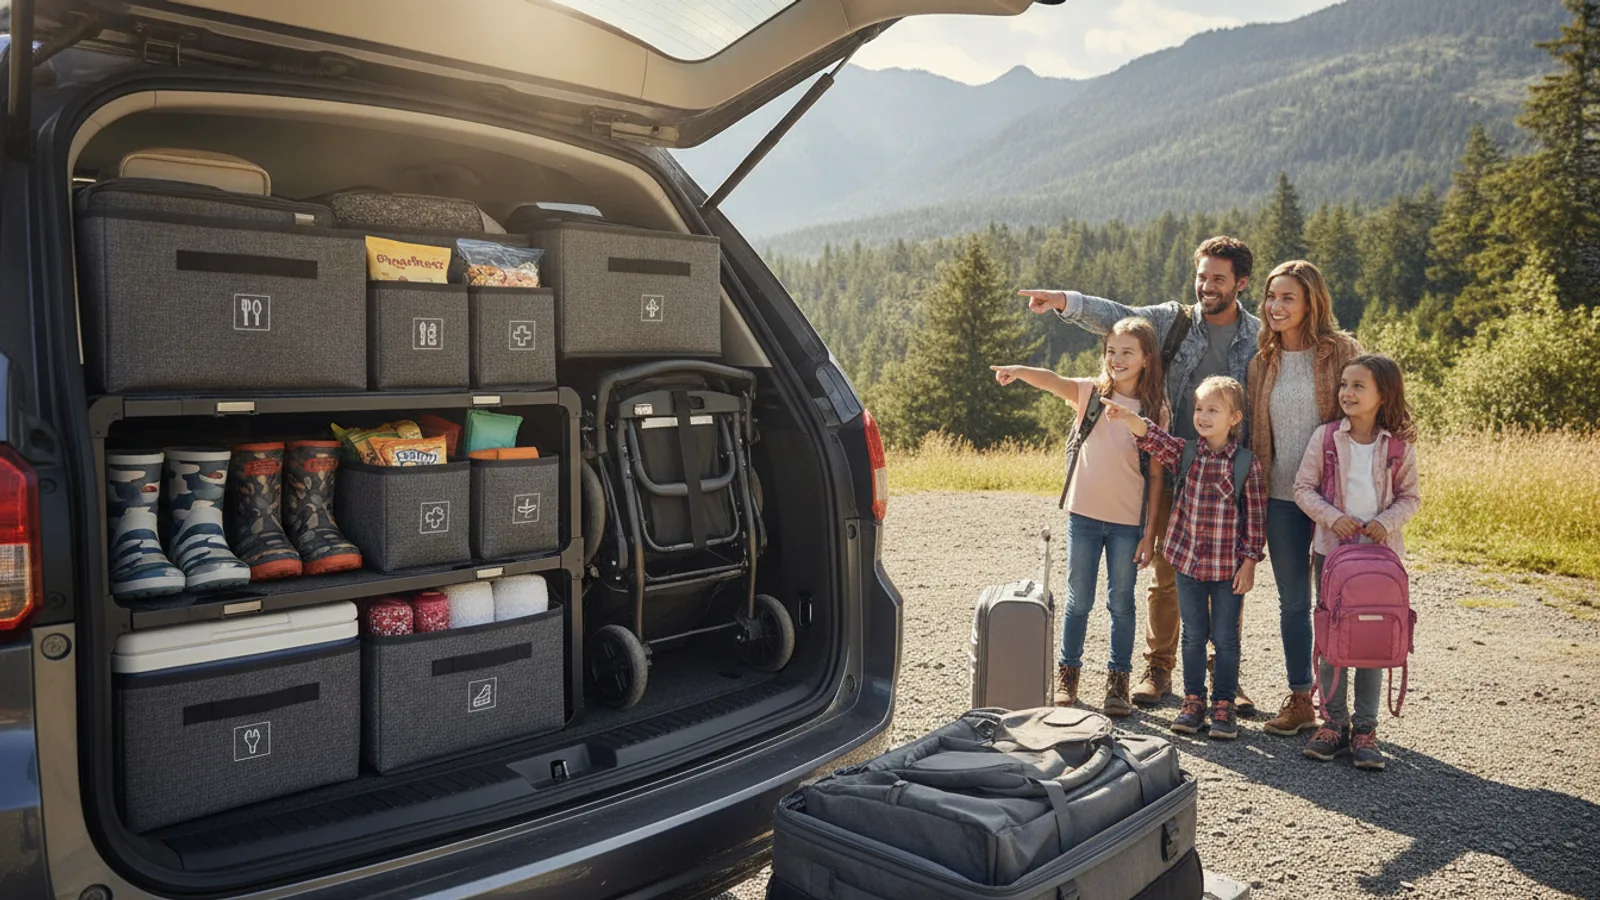
Choosing a practical boot organisation setup for family travel means balancing easy access, weight distribution, and flexible packing. This guide helps you sort gear into zones, use containers to keep items visible and secure, and adjust your layout as your family's needs change. You will learn to weigh priorities, pack for quick stops, and avoid common mistakes like overloading one side or burying essential items. The goal is a system that keeps everyone comfortable and your vehicle safe, whether you are heading out for a weekend or a long road trip.
Fast Answer
- Begin by decluttering and categorising your gear into daily-use, kitchen, sleeping, and tools, then pack heaviest items low and centred, with soft bags for fragile areas and clear boxes for visibility.
- Use a simple zone system: keep a 'grab bag' near the door for snacks and entertainment, stow sleeping gear at the back for easy overnight access, and secure all containers to prevent shifting while driving.
Before You Start
- Measure your boot space (height, width, depth) and note any wheel arches or sloped areas that affect container shapes and stacking.
- List every item your family will carry, then group them by frequency of use and fragility to decide what goes in boxes, bags, or loose.
- Choose lightweight, sturdy containers like stackable crates and collapsible fabric bins, and test that they fit your measurements before buying.
- Weigh each packed container on a bathroom scale to plan a balanced load, keeping the total under your vehicle's payload limit (check the door sticker).
Step-by-Step Instructions
Sort and categorise every item
Take everything out of your boot and spread it on the ground so you can see each piece. Group items into clear categories: daily-use (snacks, nappies, entertainment), cooking (stove, pots, food), sleeping (tents, bags, mats), and tools (jumper leads, repair kit). Then, within each category, mark each item as 'essential' or 'nice-to-have'. For a week-long trip, you rarely need three versions of the same tool. Be honest: if you did not use an item on your last trip, leave it home. This step is the foundation because it reduces volume and weight, making the rest of the organisation simpler. By eliminating duplicates and unused gear, you free up space and reduce the chance of losing items in the chaos of packing. This also saves fuel and makes the car easier to handle, as lighter loads reduce strain on brakes and suspension. Do this sorting a day before you intend to pack, so you have time to adjust your plan or buy missing containers.
Measure your boot space and container fit
Use a tape measure to record the boot's maximum height, width, and depth, and also measure the width at the floor and the height at the rear seatback, because the shape is often irregular. Note any wheel arches that protrude into the space and any slope in the floor. Then, with a notepad, sketch a rough side-view and top-view of your boot, marking the dimensions. When you buy containers, check that each one fits within those measurements, especially if you plan to stack them. Also consider whether you need to access the spare wheel under the floor, as some containers might block the cover. This step matters because containers that do not fit exactly waste vertical space and can slide during turns. A common mistake is buying boxes that look right in the shop but then stick up or leave gaps. By measuring first, you can plan a layout that uses every inch, reducing unnecessary movement. If you are between trips, you can also measure with a current load you know is comfortable, to benchmark your capacity.
Select containers for different zones
For your daily-use items, choose open-top crates or shallow boxes that you can grab quickly, and place them nearest the boot opening. For cooking and tools, use durable, stackable bins with handles that lock securely, and line them with non-slip mats to stop rattling. For sleeping bags and bulky items, use soft compression bags or large fabric duffels because they can squeeze into odd gaps. For fragile items like pans or electronics, wrap them in clothing and place them in a rigid box with a lid. Also choose transparent or labelled opaque containers so you know what is inside at a glance, but remember that opaque boxes with clear label holders are more private and secure if you park in public. The reason this matters is that different materials and shapes serve different needs: open containers allow one-hand access; enclosed bins prevent items from spilling on sharp turns; soft bags fill voids; and rigid boxes protect fragile items. By matching containers to the function, you prevent breakage and frustration.
Arrange the zone layout in the boot
Start by placing the heaviest items, such as coolers, water containers, and tool boxes, at the very back of the boot, resting against the rear seatbacks. Then put medium-weight items like camping chairs and bags on the floor in the middle. Keep the lightest, softest items like sleeping bags and duvets on the top or in the roof area if you have a cargo net. For daily-use items, stack them in an open crate directly inside the hatch opening, at a height that you can reach without climbing in. Make sure each zone does not block the others: for example, do not put the cooking box behind the daily crate, because you would have to remove the daily crate to get to the kitchen at lunch. Also, leave a clear line of sight out of the rear window, and leave a narrow space along the side of the boot for a quick poke-and-grab. This layout ensures stability because heavy items low and centred reduce rollover risk, and accessibility because you can reach daily items without unpacking everything.
Secure everything safely with straps
Once your zones are set, use cargo tie-downs or ratchet straps to anchor your containers to the vehicle's integrated mounting points, which are usually metal rings near the floor or on the seatbacks. Weave straps around the handles or around the whole stack, and tighten them until the containers do not move even when you push them hard. For loose items like blankets or pillows, place them in a large duffel that you can strap in, or use a cargo net stretched across the load area. If you have a dog crate, secure that separately with a dedicated strap. After tightening, give the whole load a firm shove from the side and the rear to test for movement. This matters because an unrestrained object becomes a dangerous projectile in a collision, and even a small box can fly forward and injure passengers. Also, a loose load creates noise and distraction while driving, which is unsafe on long trips. Good strapping also prevents your careful arrangement from collapsing into a messy pile on the first bend.
Test your setup with a trial run
After securing everything, take the car for a 20-minute drive on a mix of roads including a few gentle curves and a couple of speed bumps. Listen for rattles or shifts, and pull over to inspect the load after the first few kilometres. Check that nothing has moved, that straps have not loosened, and that you can still open the rear hatch fully to reach the daily crate. Also, have your partner or a friend stand behind the car and check that the rear view has a clear zone they can see through. Then, simulate a roadside scenario: pull over on a straight, flat stretch and retrieve an item from the daily crate, then put it back. Time how long it takes, and note whether you had to unstack anything. If it took more than two minutes, rearrange the zones. This step matters because a setup that looks good in the driveway can fail on the road, and you need to know that your system works under real conditions. It is much better to discover issues before you are on a busy motorway.
Quick Reference
| Situation | Action | Why it helps |
|---|---|---|
| You are making frequent stops for snacks or a toddler's potty break. | Keep an open-top, labelled crate with snacks, drink bottles, wipes, and a small plastic bag for rubbish, positioned directly inside the tailgate, and always on top of other boxes. | This lets you grab what you need in seconds without unloading the whole boot, and kids stay patient when you can hand them a biscuit quickly. |
| You are packing for a family of five and want to avoid overloading the car. | Weigh each packed container on a luggage scale and note the total, then compare it with your vehicle's payload rating (found on the driver's door panel), and redistribute or remove items if you exceed about 80% of that limit. | Staying under the limit keeps your car's brakes and tyres working correctly, and prevents expensive wear or safety issues on long climbs. |
| You are going on a camping trip where you will sleep in a tent each night. | Place sleeping bags, pillows, and the tent itself in soft compression sacks and store them in the boot above the heavier boxes, but always within reach of the tailgate, and secure them with a cargo net. | This makes setup at night quick because you do not have to dig through stacked boxes, and the soft bags are easy to lift out without disturbing the lower layers. |
Common Issues
- Items shift and slide during driving, making it impossible to find anything and creating noise.: Use non-slip drawer liner under every box and between stacked layers, and tension a cargo bar or telescoping rod horizontally across the boot to brace the load against the seatbacks, re-tightening after each stop.
- You packed the boot in a logical order, but after one night you cannot reach the item you need without unpacking half the car.: Create a 'first-night ready' plan: keep a separate moderate-size duffel with your overnight clothes, toiletries, and a change of shoes, and place it on top of the daily crate, clearly visible, so you can pull it out without moving anything else.
- The boot feels full but you still cannot fit a last-minute bag, or small items like books are sliding into gaps.: Fill every vacuum gap with soft items like towels or a rolled-up jacket, and use a collapsible fabric bin that you can squish into the last awkward corner, pressing it down and then securing it with a small strap to hold its shape.
Advanced Tips
- Install a lightweight 'shelf' made of a thin wooden board and two adjustable poles to create a second level for soft items, but only if your boot height allows it without reducing visibility.
- Create a 'morning kit' that includes a quick breakfast (prepacked cereal cups) and a flask of hot water, and store it in a thermal pouch right behind the passenger's seat, not in the boot, if your car has a gap.
- For very long trips, assign each family member a coloured rucksack that holds their personal items, and store them in the boot in a row, but ask everyone to keep them flat so they stack like files.
Final Checklist
- Confirm that every container is non-slide, that straps are tensioned, and that the whole load can move less than 2 cm when you push it hard.
- Verify that you can open the rear hatch fully and that the daily crate is within arm's reach without climbing into the boot.
- Check that your rear visibility is clear by having another person stand behind the car and look through the window from inside.
- Weigh the total packed boot and note the number, then compare it with your vehicle's payload capacity listed on the door sticker, and adjust if you are close to the limit.
FAQ
What is the best way to pack a boot when we have two small children?
Put the children's daily needs—nappies, wipes, snacks, a change of clothes, and a favourite toy—in a small, open-top basket or shallow box that you can lift out with one hand. Keep this basket inside the boot but at the very edge, so you can grab it without moving anything else. For longer journeys, pack a separate 'quiet time' bag with books or a tablet, and place it flat under the basket. Always secure the basket with a short strap to the boot floor, because you do not want it flying forward in an emergency.
How do I keep my boot organised when we stop at a campsite and then pack again the next morning?
Set up a simple 'camp clock' routine: at the campsite, remove only the items you need for the night and place them in a dedicated duffel bag that you take inside the tent. The next morning, immediately put that duffel back into the boot in the same position, following a mental rule: daily crate first, then sleep bag, then kitchen box. Keep a laminated checklist of your layout stuck on the inside of the boot cover, so you can replicate the order without thinking. This prevents the chaos of mixing everything and losing time.
Is it better to use many small boxes or a few large ones for a family boot?
For family travel, a mix works best: use two large, sturdy crates for heavy items like water and tools, and three or four medium, transparent bins for lighter category groups like cooking utensils or toys. Avoid tiny boxes because they create many gaps and make packing slower. Large boxes hold more but become too heavy to lift; medium transparent ones let you see what is inside without opening. Always choose wheeled crates for anything over 10 kg, but remember to secure them so they do not roll.