How To Plan A Practical Boot Organisation Setup For Family Travel
A practical step-by-step guide to how to plan a practical boot organisation setup for family travel, including preparation, instructions, common issues, tips, and next steps.
How To Plan A Practical Boot Organisation Setup For Family Travel
Planning a practical boot organisation setup for family travel means turning a cramped car boot into a zone where everyone’s luggage, sports gear, snacks, and emergency items have a clear home. A thoughtful setup saves time, reduces stress, and prevents damage to fragile items during long journeys. This guide walks you through assessing your space, choosing modular containers, packing by weight and frequency of use, securing everything safely, and making daily adjustments for easy access. It also covers what to do when plans change, how to avoid common mistakes like overpacking, and advanced tips for multi-stop trips. By the end, you'll have a repeatable system that works for short getaways and extended family vacations, keeping the boot organised even with active kids and changing weather.
Fast Answer
- Start by clearing the boot completely and measuring the usable dimensions, then sketch a simple layout that matches your family's typical luggage and gear list.
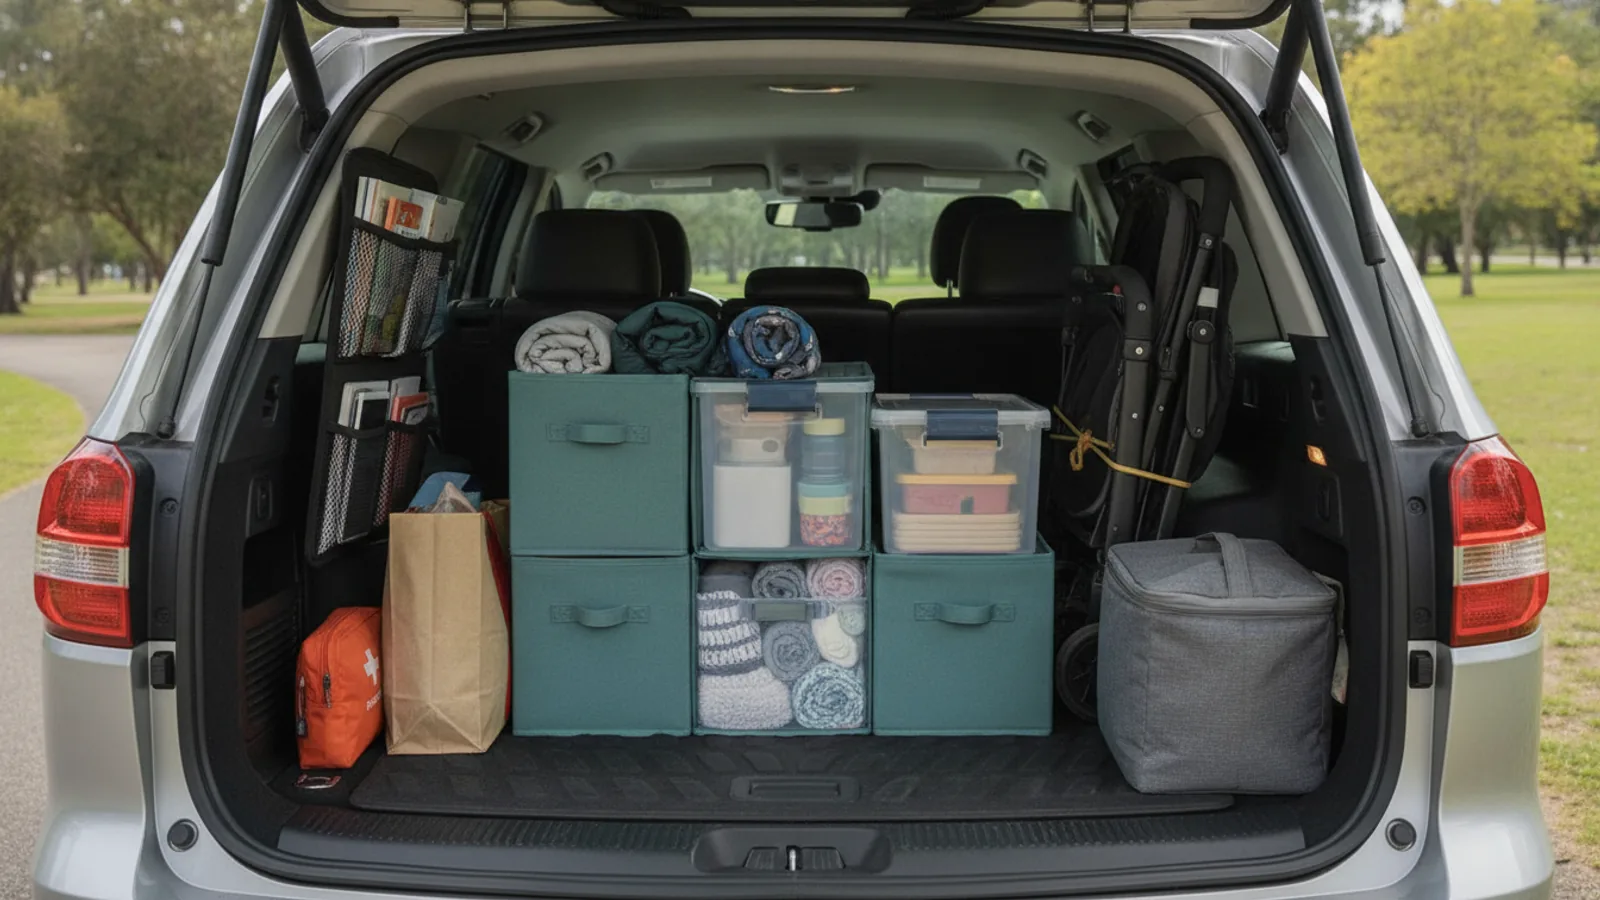
- Use stackable, see-through containers labelled by activity or family member, and pack heavy items low and near the back seat for stable weight distribution.
Before You Start
- Empty the car boot and give it a thorough vacuum and wipe-down so you have a clean slate; throw away rubbish and decide what genuinely needs to travel.
- Measure the boot's width, depth, and height at the widest points, and note any wheel arches or awkward curves that will affect where boxes fit.
- Create a family packing list that covers clothes, toiletries, entertainment, sports gear, and emergency items, and assign each category a container.
- Gather flat, stackable containers with lids, soft bags for squeezing into gaps, and straps or netting to keep taller items from toppling.
Step-by-Step Instructions
Measure and Map the Boot Space
Before you buy or borrow any container, measure the boot thoroughly. Use a tape measure to record the width, depth, and height at several points, because many boots are not perfect rectangles. Note the location of wheel arches, the spare wheel well, and any hooks or tie-down loops. Then draw a simple overhead diagram on paper. Imagine your family's typical trip: how many suitcases, rucksacks, coolers, or sports bags do you need? Mark where each item type could live. A family of four often needs one large container for clothes, another for shoes and outdoor gear, and a slim box for snacks. Write down the maximum height you can stack without blocking the rear window or the view. Also consider whether you need to flip up the back seat to carry long items. This measurement step matters because a random guess leads to a jumbled setup that fails halfway through a trip, forcing you to repack in a car park.
Choose and Sort Your Containers
Select containers that fit the shape of your boot, not the size of your gear alone. Pick stackable, see-through bins about 5–10 litres smaller than your underfloor well so they slide in easily. You need three or four sturdy crates with handles, plus soft duffel bags for compressible items like sleeping bags. Sort everything into categories: 'Daily Access' (nappies, wipes, tablets, masks), 'Meals and Snacks', 'Clothes per Person', and 'Emergency/Gadgets'. Write each category on a label with a marker, and stick it to the side of the bin. Use one small shallow tray for chargers and cables, and a mesh pocket for the first-aid kit. The rule is simple: if the item is needed at a rest stop, it goes in an easy-to-reach bin; if it's only needed at the destination, it goes deeper. This sorting prevents digging through every bag for a phone charger and keeps the boot logical even when you’re packing sleepy children at night.
Pack Heavy Items Low and Toward the Back
Start loading the boot from the bottom, placing the heaviest containers and bags against the back of the rear seat, not the very back of the boot. The reason is simple: weight near the middle of the car keeps the vehicle balanced, giving you better steering and braking. Put the largest suitcase flat on the floor, then stack lighter bins on top. Keep soft bags along the sides to fill gaps and stop sliding. Avoid putting heavy items on the seat or high up where they could topple during a turn. After loading the base, push firmly on the stack to see if it moves. If it shifts, you need to redistribute weight or use straps. This step matters because a boot that looks arranged but sloshes when you accelerate is a safety hazard, and it also undoes your organisation by making everything slide.
Secure the Load Against Movement
Use the car's built-in tie-down points if your model has them, and attach cargo straps or bungee cords across the tops of stacked bins. Alternatively, a non-slip mat on the boot floor provides a little grip, but don’t rely on it alone. You can also wedge soft bags into gaps, but for tall stacks, always use at least one strap. Loop the strap over the first bin's top edge, then pass it through the second bin's handle, then hook it to the opposite anchor. Tighten until the entire stack moves only slightly when you push. Note that a thick parcel cover swings away and can double as a barrier, but it isn't a substitute for proper anchoring. This step matters because a loose load can become a projectile in an emergency stop, and it also causes bins to burst open, spilling clothes into the boot and clogging access.
Set Up a Daily Access Zone
Dedicate the space closest to the tailgate for items you need during the journey. Place a shallow tray or a soft cooler here for drinks, snacks, wipes, and a basic first-aid kit. Put your family's tablets, headphones, and spare chargers in a small pouch that sits on top of the tray, with a label saying 'Daily'. This zone should be the last thing you pack and the first thing you open at every stop. If your boot has a side cubby, slip in a folding seat pad or a small blanket. When you park, you can reach into this zone without removing the main stack. This step matters because it turns a trunk into a pit-stop station, so you don't have to unload everything every time a child needs a drink or to change a mask.
Create a Packing Diagram and Repeat
Once everything fits securely, take a photo of the boot from above and another from the side. Print these photos and keep them in a glovebox folder, or save them on your phone. At the end of the trip, use the photos to repack exactly the same way next time, adjusting only if you discover a better arrangement. Over a couple of trips, you'll refine the setup: maybe the snack tray should go in the opposite corner, or the umbrella needs a more accessible hook. Write a short list of 'what works' and 'what didn't' in the folder. This step matters because memory fails under time pressure, and a documented layout turns a chaotic morning into a ten-minute loading routine, which is what the whole guide aims to achieve.
Quick Reference
| Situation | Action | Why it helps |
|---|---|---|
| You have to stop quickly on the motorway because a car in front brakes. | After you pull over safely, open the boot and redistribute any bins that shifted closer to the tailgate. Push them back toward the rear seat and re-tighten the secure straps. | This restores the centre of gravity and prevents the next hard stop from hurling your packed gear forward into passengers. |
| The rain starts and you need waterproofs from the bottom of a stack. | Keep one small dry bag with coats and an umbrella in the daily access zone, not buried under the main containers. If it's not there, use the boot's tool kit to unclip the parcel shelf and slide out the bottom bin. | Locating weather gear in a high-access spot avoids unpacking the entire boot, which could soak the contents and damage electronic devices. |
| You return home with dirty sports gear and wet swimsuits that smell. | Place a dedicated plastic bin with a tight lid in the boot for dirty laundry and use a separate waterproof bag for wet swimwear. Keep a small deodorise packet (like activated charcoal) in that bin. | Separating wet or soiled clothing protects the rest of your organisation from odours, moisture, and potential mildew, saving you from a deep clean later. |
Common Issues
- The boot smells damp after a trip because a water bottle leaked.: Immediately wipe the spillage with a microfibre cloth, then place a bowl of baking soda in the boot overnight to absorb moisture and odour. Always use a non-spill, screw-top bottle in the daily access zone, and line the boot floor with a waterproof, washable mat. Check under the mat for any trapped damp spots and dry them thoroughly before storing the mat.
- Bins have no handles, so lifting them out of the boot hurts your hands.: Use containers with sturdy, integrated handles. If you already have handleless bins, add stick-on straps or place a large cloth band around each bin to create a loop. Alternatively, keep a folding cargo crate with built-in handles for the heaviest items. Test the grip before loading: a single hand should lift the bin without straining your wrist.
- Forgotten items like a picnic blanket or jumper end up buried at the bottom.: Create a 'last in, first out' rule: pack the items you'll need at the destination in reverse order of use. Alternatively, use clear bags for these items and identify them with bright tags. At each stop, take one photo of the boot to remind yourself what you've packed and where. Keep a tiny notebook in the glovebox to note any item you need to move higher for the next leg.
Advanced Tips
- Attach adhesive hooks to the inside of the boot lid or the sides to hang small torches, bags, or a foldable trash holder, turning unused vertical space into storage.
- Use colour-coded soft bags (e.g., red for adults, blue for kids) that match the labels on each bin, so other helpers can pack or unpack the boot quickly without asking which pile goes where.
- Invest in a collapsible laundry hamper that fits flat in a narrow gap; pop it open when you need a mobile space to carry everything from the boot to a hotel room in a single trip.
Final Checklist
- I measured the boot and drew a layout that accounts for wheel arches and the spare wheel well.
- I packed heavy items low and near the back seat, and I anchored the stack with straps or nets.
- I created a daily access zone with snacks, wipes, and electronics that is reachable without unloading the boot.
- I took a photo of the final arrangement and saved it as the reference for future trips.
FAQ
How do I handle a boot with a slanted shape or a lip?
Measure the height at the highest and lowest points, then choose containers that are shorter than the minimum height. Use a wedge-shaped bag or a soft duffel to fill the sloped gap. For the lip, lay a non-slip pad on the boot floor and push the first bin against the lip,, then secure the stack with a strap that hooks to the seat anchors. If the lip is high, lift the floor carpet to check for a recessed area; sometimes you can slide a thin container under it.
What is the best way to keep cables and small gadgets organised?
Use a clear, zipped toiletry bag with individual compartments for each cable type. Coil each cable using a cable tie or a Velcro strap to prevent knots. Label each compartment with a small sticker (e.g., 'phone', 'tablet', 'power bank'). Place the bag in the daily access zone, standing upright in a small crate. If you have multiple kids, assign each child a colour and use a separate mini-bag per colour. This avoids the frustration of untangling cables during a fuel stop.
Should I use hard boxes or soft bags for family travel?
Use hard boxes for items that are fragile, need stacking, or must stay dry, such as electronic devices, food, or first-aid supplies. Use soft bags for clothing, bedding, and bulky but compressible items. Hard boxes provide structure and stack neatly, but they take up fixed space; soft bags flex into gaps and are easier to squeeze into tight corners. A mix works best: keep one hard box for each family member's clothes, and use soft duffels for shared items like towels. Test the stack by driving around a roundabout slowly; if you hear thudding, rearrange.